
How to import data from excel to ABC Focus version 4
Introduction
The export and import options provide an interface between ABC Focus and other packages. Here we discuss how to import data from excel to ABC Focus.
ABC Focus provides the ability for data to be imported and exported. The import file used or export file created can be in several formats, including Excel spreadsheet or a CSV file. The import / export routines are often used to import data from an external source into the software.
Note: Reporting is an alternative to the export module, as most of the reports in the software can be printed as well as exported to Excel and other formats.
Tip 1: The easiest way to see the required structure of an import file is:
Open an existing model and export the data.
Example: Export the Lines into an Excel file, then open that file to see the import structure needed to import Lines.
In summary, a file can be exported, the data changed in the spreadsheet, and then imported to refresh the model or add new information.
Tip 2: When a file is imported, the existing items in a model are usually not deleted (unless stated in this document or on screen). This means that several import files can be used and imported in succession.
Tip 3: Where FALSE is mentioned, you can use any one of these: FALSE, F, N (N for No). Can also leave the field empty or blank.
Where TRUE is mentioned, you can use any one of these: TRUE, T, Y (Y for Yes).
Import and export
Import and export
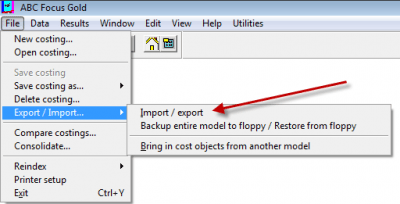
To access the import and export functions, open a model and get to the map. Then choose the appropriate option from the menu (shown below).
Import and export data
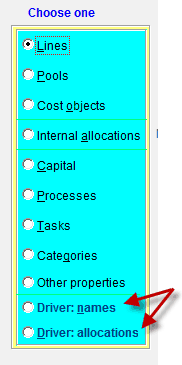
In the software, the first page, Section tab, has all the items that can be imported or exported. As shown below, these include:
- Lines
- pools
- cost objects
- internal allocations
- capital
- processes
- tasks
- categories
- other processes
- driver names and allocations.
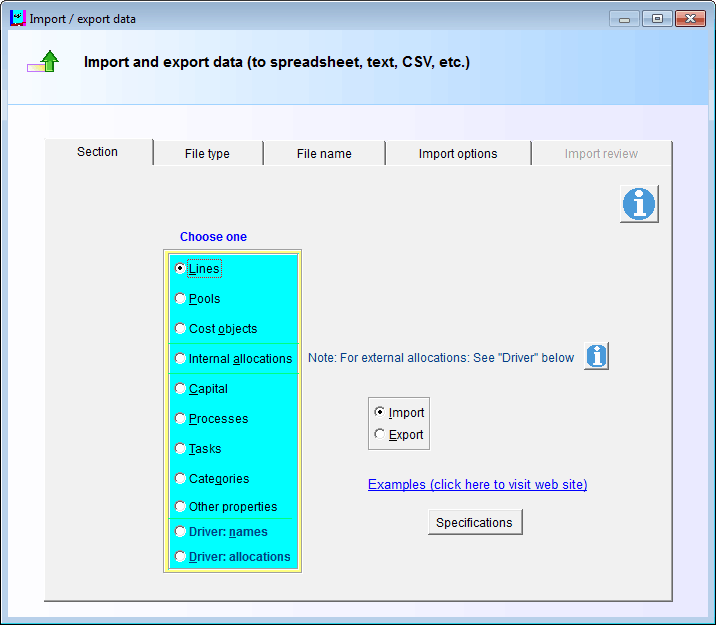
On this page you also choose Import or Export.
Specification button – If you are offline click this for a description of the import and export formats.
The document can be printed. (The web page you are reading now has more detailed information than the specifications document and should be preferred if you are online).
What to import first
Note: If you are importing data import data from excel to ABC Focus or elsewhere there is a recommended order in which the data should be imported.
The Information button on the top of the Section page explains it as follows:
The order in which data is imported is important. Decide whether you need to do the preliminary steps.
Preliminary steps
a. If you are using your own categories or processes, import these.
b. If you are using Drivers, import the Driver names.
Main import steps
1. Import Lines, pools and cost objects.
2. Allocations are next.
3. Capital, Tasks, etc are last.
If you are importing lines with categories and/or drivers, the category and driver must already be in the model.
Lines, pools and cost objects should be imported before allocations are imported.
Notes
The import file should be closed.
You can create a sample import file by exporting data from any model!
General information
Choose a section (e.g. Lines), and then click on Import or Export. On the next page choose the file
type, e.g. CSV or Excel. On the third page type in the file name (overwrite the name suggested with
whatever you prefer).
The import file should be closed before doing the import. For example, if the import file is in Excel,
Excel itself can be open, but the spreadsheet should be closed before processing.
Excel examples:
Tip: The easiest way to see the required structure of an import file is to open an existing model and export the
data.
The recommended way to create an import file is to first export some data to see an example. Then
use the exported file as an example of what is needed to import your own data! This technique is
explained below.
Excel examples:
Tip: The easiest way to see the required structure of an import file is to open an existing model and export the data.
The recommended way to create an import file is to first export some data to see an example. Then use the exported file as an example of what is needed to import your own data! This technique is explained below.
How to import expense lines
To see the file structure required, open a model in ABC Focus and export the data.
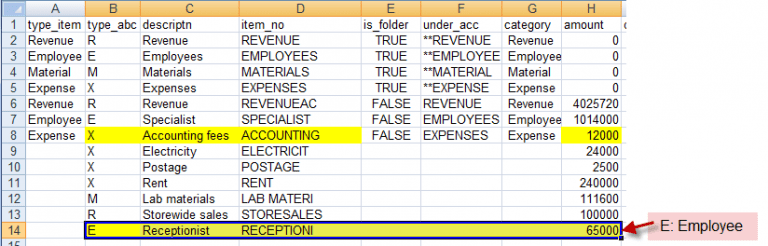
For the sample data in ABC Focus, the first few lines of the exported lines file looks like this:

We have highlighted the key fields for the expense line: Accounting fees. They show the minimum
information needed to import expense lines into the software.
How to import new expense lines
Here is the same file with three additional expense lines added
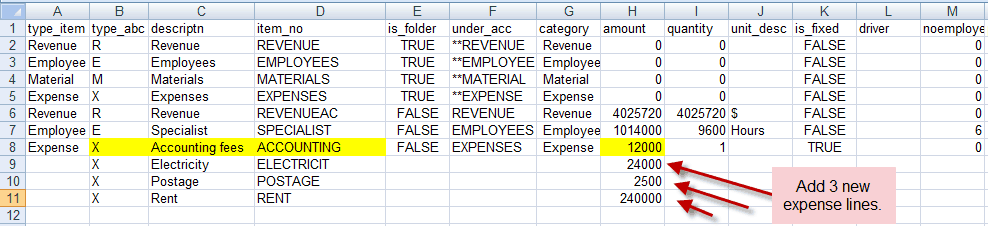
Notice that the first spreadsheet above has most of the fields filled with data, whereas the added lines have minimal information. To import an expense line you need four pieces of information:
* X because it is an expense.
*The account Description and Your code.
*The Amount.
Most users will be satisfied with just this information. However, the other fields can be used to specify additional details if required.
Default folders (which are present in every model)
This example shows the spreadsheet for exported lines:
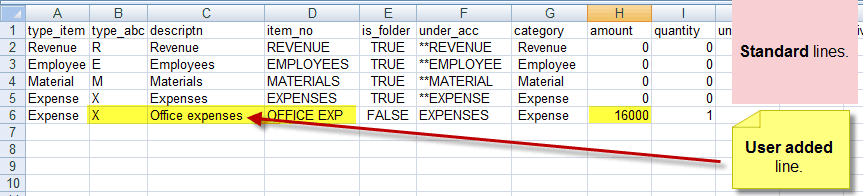
Notice the first four rows are the folders that are always present. They are folders because is_folder is TRUE.
The last line shows a user added expense, for Office expenses. The exported file can be imported into a new model, or it can be simplified: All the default folders can be deleted. Only the one row for Office expenses need be present. Also, only the items highlighted are required. The other columns can be left blank. So to import this line, the import file can look like this:

Important: If you keep the default folders in the import file, ensure that their is_folder column remains unchanged at TRUE.
How to import new revenue and material lines
The importing of revenue and material lines is similar. Here is an example:

Structure of a revenue, material and expense line
The fields are:
Type_item: Revenue, Material or Expense. This column is filled when data is exported for information. It can be empty when data is imported, as it is not used during an import.
Type_abc: Type of line. Should be R, M or X (for Revenue, Material or eXpense).
Descriptn: Item description
ITEM_NO: Your code
Is_folder: TRUE or FALSE
Under_acc: Use Your code
Category: Category name
Quantity
UNIT_DESC: Unit of measure
Is_fixed: Short-term fixed: TRUE or FALSE.
Driver: Your code of driver
Note: Only the highlighted fields shown in the examples above are required. The rest are optional.
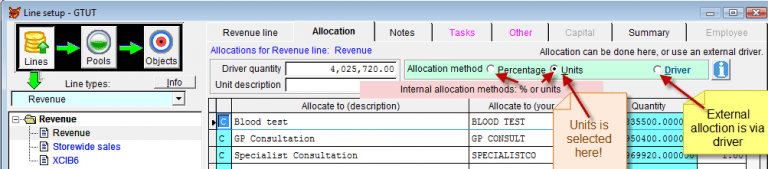
Driver field
To use this field, you should be familiar with the three allocation methods in ABC Focus. In the software, the allocation method is chosen on the Allocation page. For example, this revenue line uses the internal allocation method of Units:
On the other hand, this expense line uses the Driver allocation method:
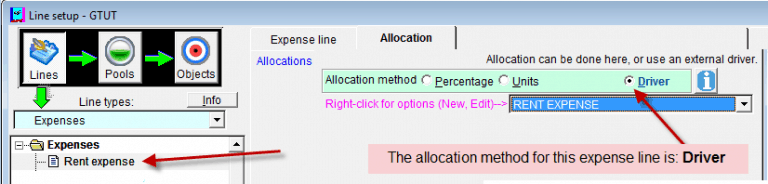
Import an expense line and tell it to use the Driver allocation method.
To specify that the Driver method should be used, enter Your code for the driver name in the Driver column.
So if an expense line Rent is to use the Driver named Rent expense, enter RENT EXPENSE in the Driver field when importing the expense line.
If the driver field is empty, the item will use the internal allocation method. If filled, it will use an external driver.
How to import Employees
The importing of employees is similar. Example:
The fields above are the same as for Expenses (discussed above). The additional fields for employees are.
noemployed: Number employed (e.g. 3 people)
PAID_NORM: Salaries / wages (before on-costs and other payments)
oncost_amt: On-cost amount
PAID_OTHER: Other payments
HRS_NORMAL: Normal hours paid
HRS_OTHER: Other hours paid
hrs_flow: Hours to pools. TRUE or FALSE.
Import Employee hours
To include employee hours in the import file, fill in the appropriate columns. Here is the employee line Receptionist with additional information supplied
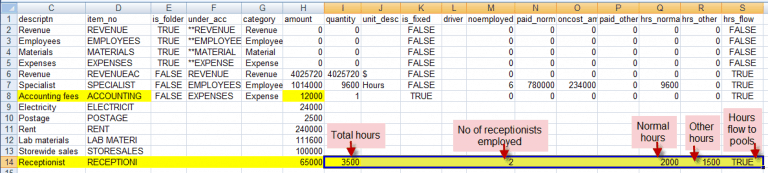
Quantity: This is the total hours for the receptionists. It does not have to be filled in. If it is zero, it will be worked out during the import – it is the sum of the two HOUR fields discussed below. Note: If only the Quantity field is filled in for an employee, the import file will assume that it is normal hours paid.
Number employed (noemployed): 2 receptionists.
Normal hours paid (HRS_NORMAL): 2,000. See Employee HOUR fields note below.
Other hours paid (HRS_OTHER): 1,500. See Employee HOUR fields note below.
Hours to pools (hrs_flow). T or TRUE or YES. See note below.
Hours to pools: This column should normally be TRUE. If you are importing a new employee, this field is imported if
it contains data. However, if the employee already exists in the model and the import file is being used to refresh
some of the information, then: if Hours to pools is YES/TRUE in the import file, it is imported.
If it is NO/FALSE (or not filled in): It will not overwrite the existing setting for this employee unless you go to the Import options page and check Hours to pools.
Employee HOUR fields
When importing a new employee, these fields are imported if they contain data.
However, if the employee already exists in the model and the import file is being used to refresh some of the information, then:
If the import file has a non-zero amount for the Quantity field, and the import file has:
Quantity field = Normal hours paid (HRS_NORMAL) + Other hours paid (HRS_OTHER)
then: all the Hours values are imported (irrespective of the Import options check-boxes below).
If you want the two hours fields to be imported, and the number employed, go to the options page
and check these options:
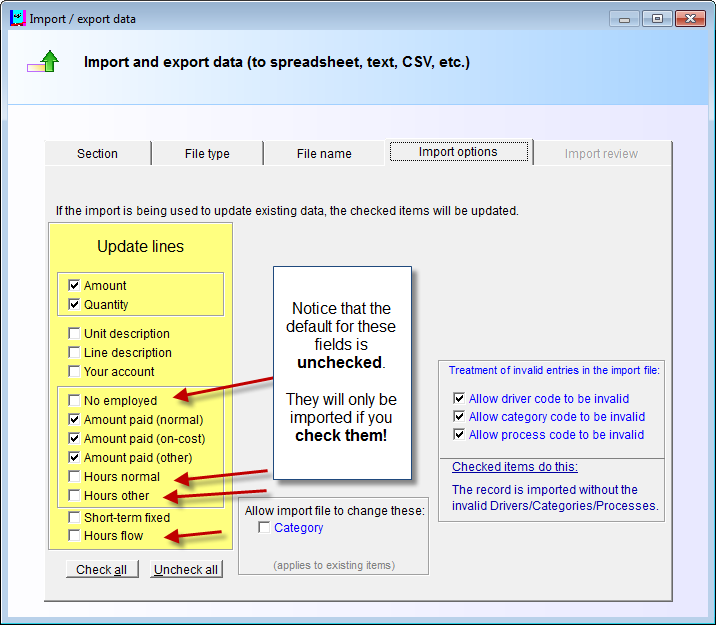
The reason that these are unchecked by default is:
When refreshing existing employee information, often the import file is filled with the amounts paid and the hours are left zero. If the hours have been filled in manually or via another import file, one would not want the zero hours values to overwrite existing values. If required, use the options page to choose the items that should be updated during the import.
For employees, this applies:
Amount = paid_norm + oncost_amt + paid_other
If only the Amount field is used, the paid_norm field will be made the same as the Amount field.
If the Amount field is zero, and the other three fields are used, the Amount field will be calculated as the sum of the other three fields.
How to import Pools
To see the file structure for pools, export pools from a model in ABC Focus.
For the sample data in ABC Focus, the first few lines of the Pools file are shown:
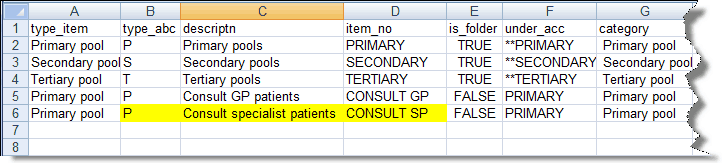
The key fields are highlighted for the primary pool Consult specialist patients.
They show the minimum information needed to import pools into the software.
The spreadsheet below shows how to import three pools:

To import a pool three pieces of information are needed:
* P, S or T to specify the kind of pool: Primary, Secondary or Tertiary.
* The pool Description and Your code.
Most users will be satisfied with just the information shown above. The other fields can be used to
specify additional details if required.
The first few fields for pools are the same as for Expenses (discussed above). The additional fields
specific to pools are.
process: Process name. It can be left blank. If it is entered, the process must already exist in the model. It is case sensitive.
IS_VALADD: Value adding: TRUE or FALSE.
IS_QTYDRV: Use driver quantity: TRUE or FALSE.
The Value adding and Use driver quantity fields are check-boxes available when you enter pools manually. Look at the Data entry screen for pools for more information on these check-boxes.
Additional note for: Use driver quantity (Y/N):
This note applies if the pool already exists in the software and you are using the import file to refresh some of the information.
If Use driver quantity is YES/TRUE in the import file, it is imported.
If it is NO/FALSE (or not filled in), then it will not overwrite the existing setting for this pool unless you go to the Import options page and check Use driver quantity.
Default folders (which are present in every model)
As was discussed above for lines, the first few rows of exported pools have the three pool folders that are always present. They are folders because is_folder is TRUE. All the default folders can be deleted when creating your own import file if you wish.
How to import objects (both cost objects and composite objects can be imported)
To see the file structure for objects and composite objects, export Objects from a model in ABC Focus. This technique has been discussed above for lines and pools and is not discussed further.
The spreadsheet below shows how to import objects and composite objects:

Note: The first column can be left empty. It is used to illustrate which row is the cost object and composite.
To import an object, three pieces of information are required:
C or B to specify the kind of object: Cost object or Composite.
The object Description and Your code.
The other fields can be used to specify additional details if required, but are not required.
The first ten fields are the same as for lines. The following additional field is specific to cost objects:
Process: can be left blank. If entered, the process must already exist in the model. It is case sensitive.
Import internal allocations
As an example, here are the allocations for a revenue line in the software:
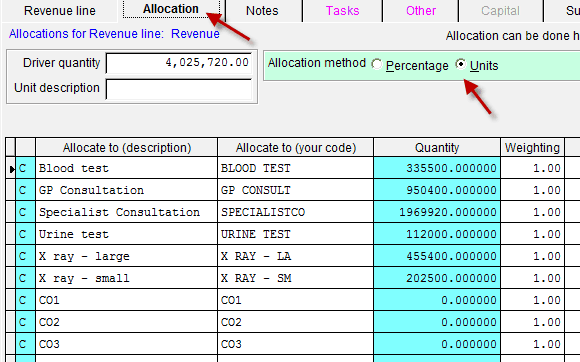

This data can be exported using the internal allocation option shown above on the right:
Below is an example of the exported data for a revenue line. As usual, export first to see what is required to create an import file. The export and import files are the same.
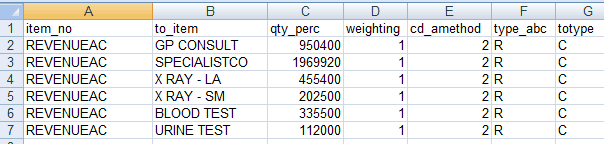
The exported columns are:
ITEM_NO: The item being allocated. This is the Your code for the item. In the example above, the Revenue line has Your code = REVENUEAC.
Notice that ITEM_NO is the same for the 6 rows shown (row 2 to 7). This is because the revenue item is allocated to several items.
TO_ITEM: The item it is allocated to. This is the Your code for the item it is allocated to.
QTY_PERC: This is the allocation Quantity or Percentage. The CD_AMETHOD column specifies whether it is Quantity or Percentage (see below).
Weighting: Weighting.
CD_AMETHOD: Use 1 for percentage and 2 for units. All rows for the same ITEM_NO must use the same CD_AMETHOD. It warns if they are inconsistent.
The final two columns are not required in the import file. They are shown for convenience in the exported file.
type_abc: the type of the item in column A. R is Revenue.
totype: the type of the item in column B. C is Cost object.
These are the valid values for type_abc and totype:
Lines:
Revenue: R
Employee: E
Material: M
Expense: X
Pools:
Primary pool: P
Secondary pool: S
Tertiary pool: T
Objects:
Cost object: C
Composite cost object: B
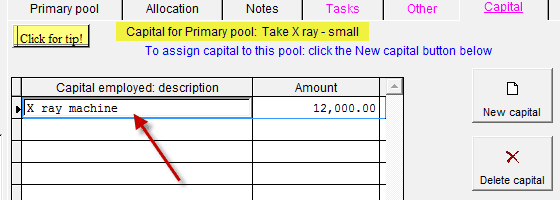
Importing capital
This is an example of Capital entered into the software:
This is the same data exported to Excel:
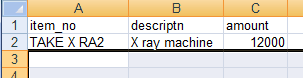
The fields are:
ITEM_NO: Your code for the pool (capital is allocated to a pool)
descriptn: Capital description
Amount.
Special note for importing of capital: When capital is imported for a pool, any prior capital for that pool is deleted.
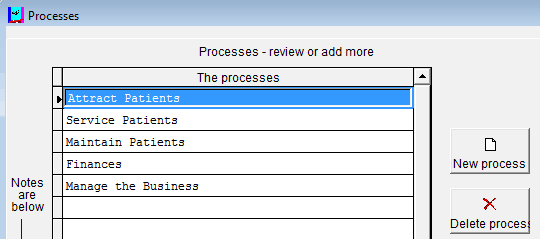
How to import processes
An example of Processes entered into the software:
This is the same data exported to Excel:
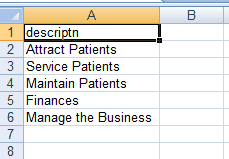
There is only one field for the Process description. When importing Processes: if the process already exists, it is not deleted or imported. If the import file contains a process that is not yet in the file, it is imported.
Import tasks
An example of Tasks entered into the software:
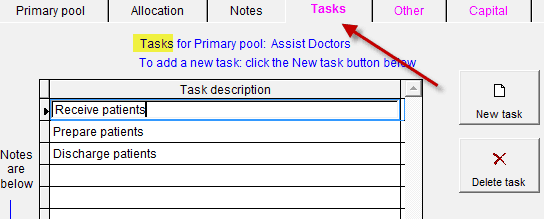
This is the same data exported to Excel:
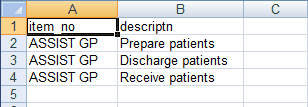
The fields are:
ITEM_NO: Your code for the item.
descriptn: Task description
Special note for importing of Tasks: When Tasks are imported for an item, any prior Tasks for the same item are deleted.
Importing categories
This is only required if you are adding to the standard categories provided in the software.
These are the fields:
Descriptn: Category description
Type_abc: Type of category.
These are the valid values for type_abc:
Lines:
Revenue: R
Employee: E
Material: M
Expense: X
Pools:
Primary pool: P
Secondary pool: S
Tertiary pool: T
Objects:
Cost object: C
Composite cost object: B
Example of importing a revenue category called Department 1 via a CSV file:
“Department 1”, “R”
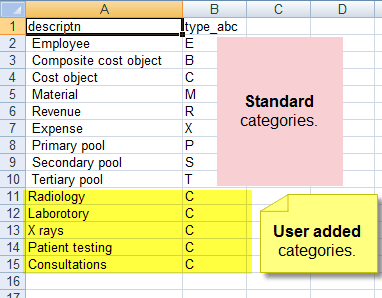
When categories are exported, the standard categories are shown first, and then any added categories.
Note: The standard categories have a space in front of their names, as this places them first in
selection lists. This is recommended.
To create an import file, you can delete the standard categories or leave them in the import file as
you choose. The example below shows new categories at the bottom. This example is for new Cost
object categories (type_abc is C).
Import other properties
These are the fields:
ITEM_NO: Your code for the item (can be a line, pool or object: anything that has the Other property page available within the software).
Descriptn: Description of other property
Worth: Worth is a character field, so can have a numeric or non-numeric value.
How to import drivers: names and allocations
These are options on the Export / import screen:
Import drivers: names
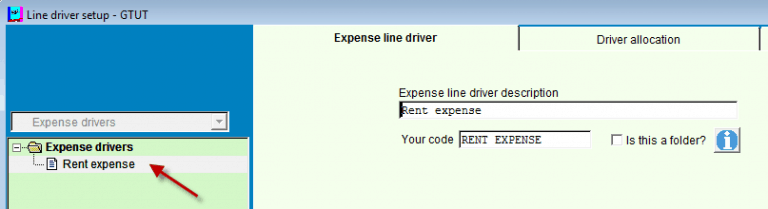
This is a driver name in the software:
Exporting to Excel gives the following:

The key fields are highlighted below. To import a new driver name, add information as per the example below

The fields are:
Type_item: Expense, etc.
Type_abc: Type (see below).
Descriptn: Driver description
ITEM_NO: Your code
Is_folder: TRUE or FALSE
Under_acc: Use Your code
Quantity
UNIT_DESC: Unit of measure
These are the valid values for type_abc:
Lines:
Revenue: R
Employee: E
Material: M
Expense: X
Pools:
Primary pool: P
Secondary pool: S
Tertiary pool: T
Objects:
Composite cost object: B
(Cost objects do not have a driver).
Default folders (which are present in every model)
This example has exported driver names:
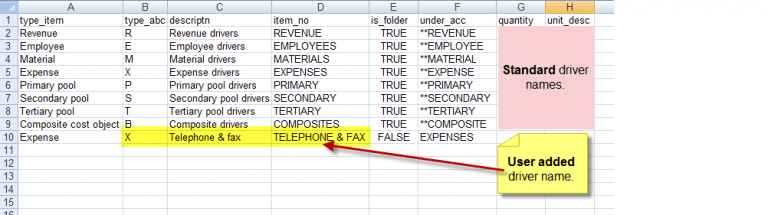
Notice the first several rows are the folders that are always present in an exported file. They are folders because is_folder is TRUE. When making an import file, all the default folders can be deleted, or they can remain in the file as you prefer.
Important: If you keep the default folders in the import file, ensure that their is_folder column remains unchanged at TRUE. For your additions, the is_folder column is usually FALSE (or can be blank, which the import routine interprets as FALSE).
The last line shows a user added driver name for Telephone & fax. The exported file can be imported into a new model, or it can be simplified: All the standard rows can be deleted. Only the one row for Telephone & fax need be present. Also, only the items highlighted are required. The other columns can be left blank.
So to import this item, the import file can look like this:

Note: It does no harm to leave the default folder rows that were exported in the file if you wish, but they are not usually required.
As already mentioned, if you keep the default folders in the import file, also ensure that their is_folder column remains unchanged at TRUE.
Import drivers: allocations
The internal allocation method discussed above and the Driver allocations are similar – there is one difference:
ITEM_NO: For driver allocations, this is Your code of the driver. For internal allocations, ITEM_NO refers to the item being allocated.
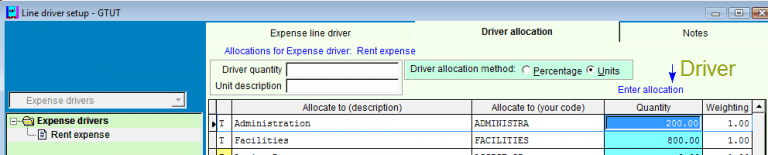
This is the driver allocation page in the software:
Exporting to Excel gives the following:
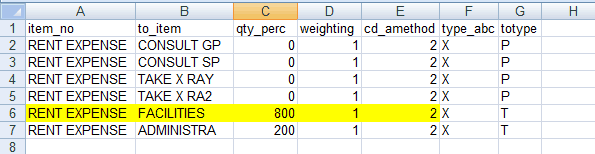
The key fields are highlighted.
Notice that some of the rows have the qty_perc field at zero. When you export the allocations, all the possible allocations available are exported. This corresponds with the items seen in the allocation grid in the software. Only the rows that have allocations will have a value for the qty_perc field.
The exported columns are:
ITEM_NO: The item being allocated. This is the Your code for the item.
In the example above, the Expense driver name has Your code = RENT EXPENSE.
Notice that ITEM_NO is the same for several rows. This is because the Expense driver name is allocated to several items.
TO_ITEM: The item it is allocated to. This is the Your code for the item.
QTY_PERC: The allocation Quantity or Percentage. The CD_AMETHOD column specifies whether it is Quantity or Percentage (see below).
weighting: Weighting
CD_AMETHOD: Use 1 for percentage and 2 for units. All rows for the same ITEM_NO must use the same CD_AMETHOD. It warns if they are inconsistent.
The final two columns are not required in the import file. They are shown for convenience in the exported file.
type_abc: the type of the item in column A. R is Revenue.
totype: the type of the item in column B. C is Cost object.
These are the valid values for type_abc and totype:
Lines:
Revenue: R
Employee: E
Material: M
Expense: X
Pools:
Primary pool: P
Secondary pool: S
Tertiary pool: T
Objects:
Cost object: C
Composite cost object: B
Sample import files
We have created a complete set of import files to illustrate how data can be imported into ABC Focus. The import files were created by exporting data from an ABC Focus model. The files as exported are completely suitable for importing into another model. However, for clarity, we removed the extra information from the Excel files using the notes above as our guide.
Note: The import files can be opened in Excel and used as examples. The files were created as XLS
files (instead of XLSX) so they can be used by a wider range of users.
Before you import data, start a new model
Otherwise the data will be imported into the existing model. Any existing data in the model is not removed. When you import, the imported data is always added to any data already in the model. Once the model has been created, unzip the file obtained from the link below into the folder that has your new model, e.g. c:\abc4\models\test.
Click here to get ABC Focus sample import files File name is: ImportABC.zip 44 kb
Data order
As previously mentioned: If you are importing data, there is a recommended order in which the data should be imported. Read the Information button on the top of the Section page where the order is explained, then follow below.
Import Categories, Processes and Driver names
Note: All three can be skipped if you are not using these features. In this description we will import everything, but for your own data you can skip any steps that are not relevant.
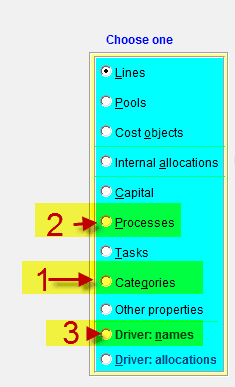
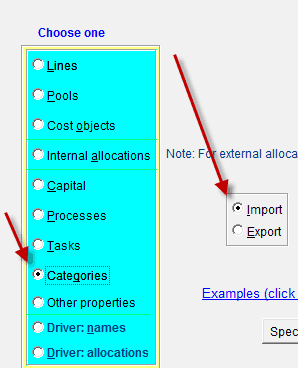
Step 1: Import categories
On the first page, choose categories (1 in the picture above) and import.
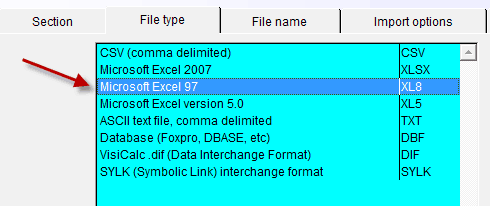
On page 2, File type, choose the appropriate type of file. For this example, you must choose Microsoft Excel 97, because that format was used to create the sample files you are importing.
Later, for your own data, use any of the formats.
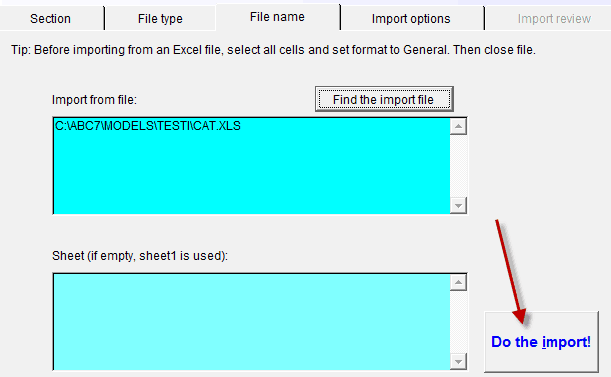
On page 3, File name, you can type in the full path and file name. The Find the import file button is provided for easy navigation to an appropriate location.
For this example, click Find the import file. Locate the file cat.XLS on your hard disk. Then choose Import.
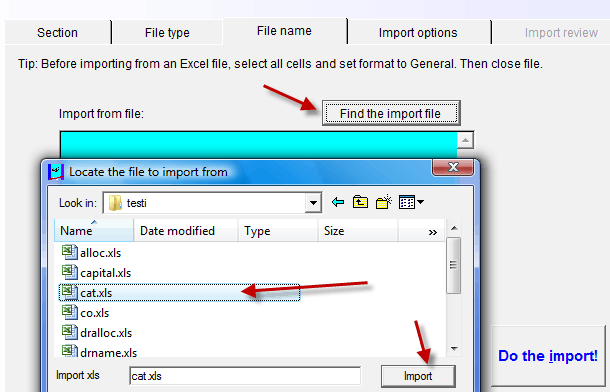
The file name to import, cat.XLS, is entered into the box. Nothing has been imported yet.
To import the file, click on Do the import!
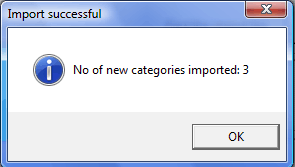
You will see a message similar to the following
The last page is a review of what was imported, what was not imported and what was refreshed. If any lines were not imported, click on them and read the explanation given. Then fix the import file and repeat the import process.
Review the data imported on the Import review page:
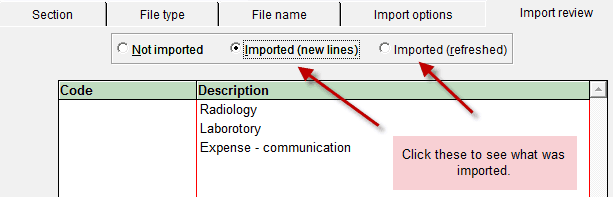
Three new categories were included in the import file. The refreshed categories (if any) means that some categories in the import file already existed in the model. Note: New models always contain some categories.
Now import the other data files in the order shown below.
NB: Make sure you go to the first page and choose the item you are importing, then go to the other pages and import each in turn.
Import processes: process.xls
Import driver names: drname.xls
Import lines: line.xls
Import pools: pool.xls
Import cost objects: CostObject.xls
Import internal allocations: alloc.xls
Import driver allocations: dralloc.xls
If used, these can also be imported:
Import capital: capital.xls
Import tasks: task.xls
Import other properties: other.xls
Exit the import form. When you open lines, pools, etc on the map, you will see that the model has all
the data from the import files.
Conclusion
Conclusion
The export and import options provide an interface between ABC Focus and other packages. All the data that a user can enter into ABC Focus can also be imported.
The easiest way to create your own import file is to enter one item manually into ABC Focus, and then export it. You can then use that as an example for other import lines.
It is easy to import and export data using the techniques discussed above.