How to import data from Xero into Visual Cash Focus
Introduction
Xero and other accounting packages store the historical data of the business (“Actuals”). They are the financial transactions that have already occurred.
Visual Cash Focus forecasts the budget for a business or entity. It organises the financial transactions that are expected to occur over the next year (or more). It also reports actual performance versus the budget.
Xero and Visual Cash Focus combine to give you a full picture of your business.
The instructions below can also be downloaded here
Xero to Visual Cash Focus

As shown in the diagram above, Xero can be interrogated and asked to supply its Actual data to Visual Cash Focus.
Cash Focus Integrator
Visual Cash Focus has an Import from Xero option. It extracts Actuals from Xero. We show how to use the Cash Focus Integrator below.
Note: Nothing is written to Xero; rather Xero is asked for Actuals and these are imported into Visual Cash Focus.
Getting started with Xero
If you are a Xero user and already have company data, you are good to go.
Setting up a Xero account (for a new Xero user)
If you do not have a Xero account, go to www.xero.com and signup for a free trial. Xero will send an email asking you to verify your account. Once verified and have entered a password, you are ready to start.
Tip: If you are just beginning with Xero, use the Demo Company within Xero for testing (see below).
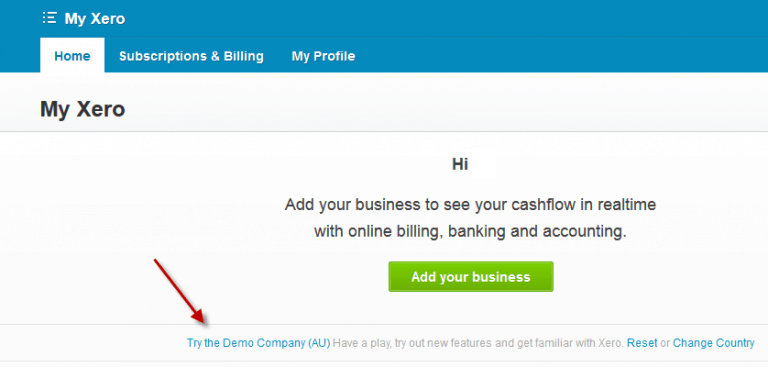

You can import these from a Xero company:
- The Xero accounts
- Xero amounts (or “Actuals”).
How to import data from Xero into a Visual Cash Focus model:
The advantage of the new Cash Focus Integrator is that it will automate the import of data from Xero for you. Before you start working on your existing model, we suggest you try the techniques we give below so you can see how the Integrator works on test models.
Importing Xero accounts
Start a new model in a Visual Cash Focus model and get to the map. From the File menu, choose Export / Import and then choose Import from Xero.
You see a form similar to this:
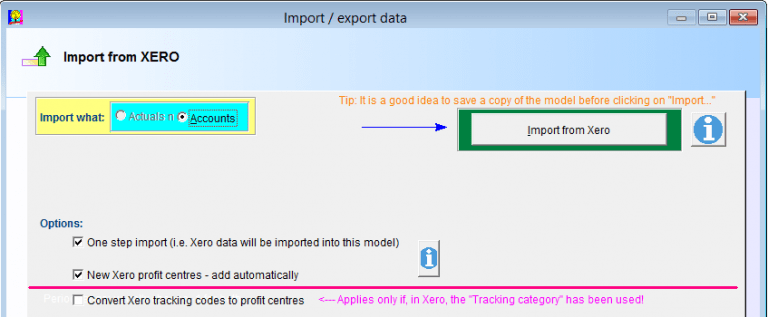
As the Visual Cash Focus model is new, it has no data and hence no actuals. At the top Accounts is selected. Leave everything at its default setting and click Import from Xero.
You see a form similar to this:

This form will be used to talk to Xero. Click on Get Key.
Tip:
- The little Xero Integration window shown above is actually a separate application. The Visual Cash Focus application waits for that window to close before continuing.
- If you click out of the Xero Integration window, you can always return to it by clicking on its icon at the very bottom of the screen (shown below).
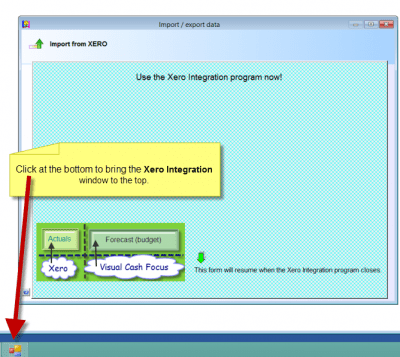
After clicking Get Key, there is a short wait while your browser opens. It asks you to login to your Xero account. (You may not see this step if you are already logged in).
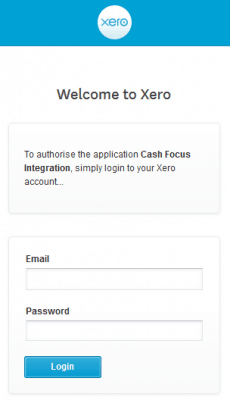
Enter your Xero email and password and click login. You will be asked to Authorise access to your Company data. Choose your company e.g. Demo Company and click Authorise.
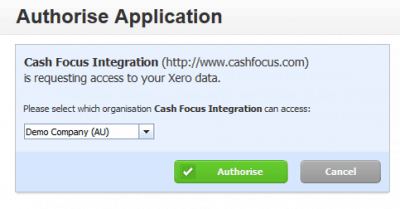
When authorised, you are presented with the Xero code, like this (code is highlighted below in yellow):

This code is needed, so double click it and then Copy (i.e. Ctrl +C).
Now click on the little Xero Integration icon at the bottom of the screen.
Paste in the number (Ctrl+V) into the Authorisation Code field:

The next step is to Connect, so click Connect. After connection has been established, the Import button becomes available. Click import.
After processing, the Xero Integration form closes. Click on the Visual Cash Focus icon at the bottom of the screen and return to the Visual Cash Focus application.
You will see the ready message.

Click OK. Close the Import form with the little red close window icon.

View Xero accounts in Visual Cash Focus.
If you click on Accounts and budgets, it tells you:

- Go to organisation details and change the opening balance sheet date to the end of last month. For example, if today is 14th February, change it to 31st January. (Note: you should use the date you are reading this note as your reference – we want the prior month end. If you are reading this in May, the date wanted is April. Usually this can be anything, but we will use the end of last month date a little later in this example).
- Go to periods and add 15 months.
- Click on Accounts and budgets.

Summary: we successfully imported Xero accounts into a new Visual Cash Focus model.
Importing actuals
As we saw above, this model is not yet ready to import data from Xero, because it has no Actuals. Xero data is “Actual” data, so we need to make room for it in Visual Cash Focus by doing a Rollover.
On the map click Rollover. Leave the default at 1 and click Do the Rollover. Click Yes or OK on any messages. You will be back at the map. You have made place in Visual Cash Focus for Xero Actuals. So import them now using the instructions below:
From the File menu, again choose Export / Import and then choose Import from Xero.
This time Actuals is available and selected. Also period -1 is suggested
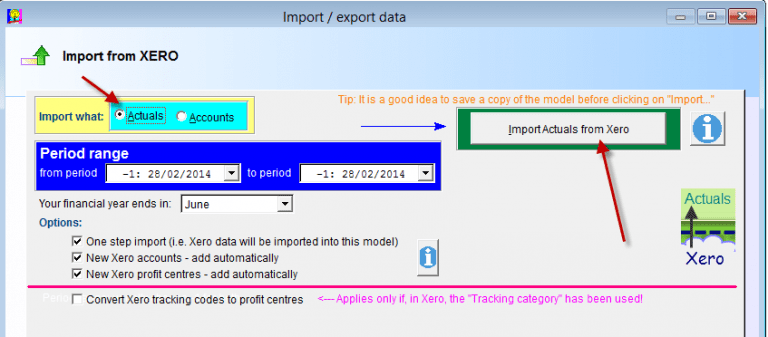
Leave all the items at their default values and click Import Actuals from Xero. Follow the same procedure as outlined above:
- 1. Get key
- 2. Paste in the key
- 3. Connect.
- 4. Import.
When done, you see the ready message. Click OK and close the form.
From the map, go to Results – view. On the Profit and loss page click Actuals. You see the Actual data has been imported into Visual Cash Focus.

Go to the Balance sheet page, click Actuals. You see the Actual data from Xero has been imported into Visual Cash Focus.
Note: The Opening balance sheet has been filled in with an opening retained income value and a balancing entry. When you are working with your own data, you will already have supplied the opening balance sheet information.
Notice that the last line of the balance sheet is Balances. This should be zero if the opening retained income is correct and the Xero amounts have been imported correctly into Visual Cash Focus.
Importing the chart of accounts and actuals in one step.
Try this. Start a new model. As you did before, go to Organisation details and change the opening balance sheet date to the end of last month. Then go to periods and add 15 months.
On the map click Rollover. Leave the default at 1 and click Do the Rollover. Click Yes or OK on any messages.
From the File menu, choose Export / Import and then choose Import from Xero.
This time we will not first import the Xero accounts and then the actuals. Instead this time import both the accounts and actuals in one step.
Actuals should be selected, and the checkbox Add any new Xero accounts should be checked.
Leave all the items at their default values and click Import Actuals from Xero. Follow the same procedure as outlined above.
- Get key
- Paste in the key.
- Connect.
- Import.
When done, you see the ready message.
Go to Results – view. On the Profit and loss page click Actuals. You will see that the accounts are here plus actuals from Xero have been imported into the software.
This is useful when importing actuals into your own models. Any new accounts that were added into Xero are automatically downloaded into Visual Cash Focus during the import of Actuals.
Profit centres
How to setup Profit centres in Xero
If you have the Gold edition or better of Visual Cash Focus, and work with Profit centres, you can set up Xero to also use Profit centres.
This paragraph is for new Xero users who have not yet implemented tracking codes in Xero. (if you already know this, read on to see how these are imported into Visual Cash Focus).
In Xero, go to Settings, then General Settings. Choose Tracking.

Click Add tracking category:
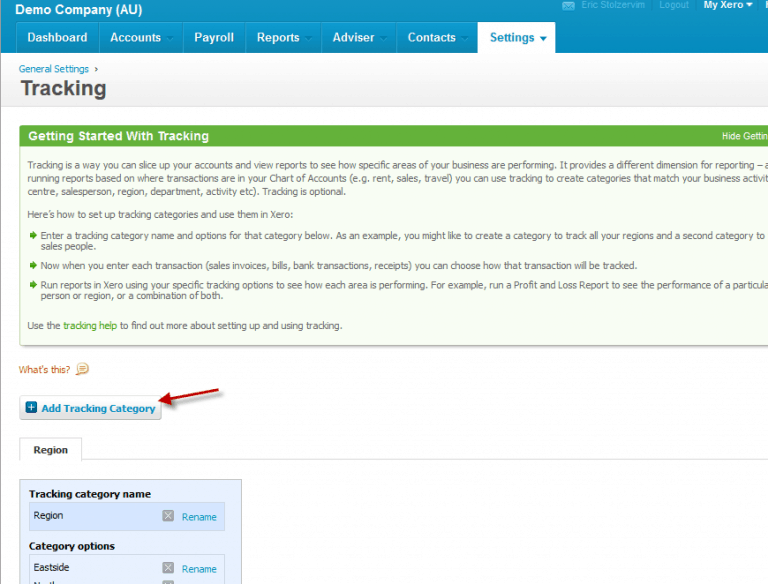
Create a new tracking category name. For this example lets call it Division (or profit centre if you prefer).

Under it create the category options shown above (use the Add another item if you need more rows).
Using the tracking (profit centres) in Xero
Here is an example of an invoice:
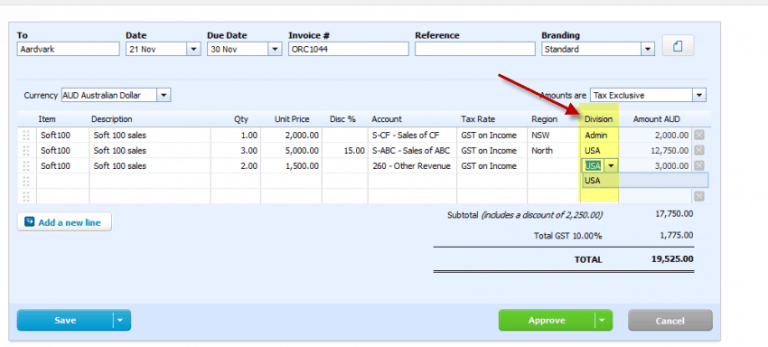
Notice that because you elected to use a tracking category in Xero, a column becomes available called Divison. Use it to assign each line to a tracking category.
Note: If you create more than one tracking code in Xero, you will have more columns to fill in. When you import into Visual Cash Focus, you will select one tracking code and the categories under it will become the profit centres in Visual Cash Focus.
To see profit centres in action, create a new invoice in Xero dated today. Add some lines and assign them to one of the items under Divison.
Importing Xero data with profit centres into Visual Cash Focus
Start a new Visual Cash Focus model. As you did before, go to Organisation details and change the opening balance sheet date to the end of last month. Then go to periods and add 15 months.
On the map click Rollover. Leave the default at 1 and click Do the Rollover. Click Yes or OK on any messages.
From the File menu, choose Export / Import and then choose Import from Xero.
As you now want to work with the Xero profit centres (tracking codes), click on Convert Xero tracking codes to profit centres. Leave all the other settings at their defaults, as shown
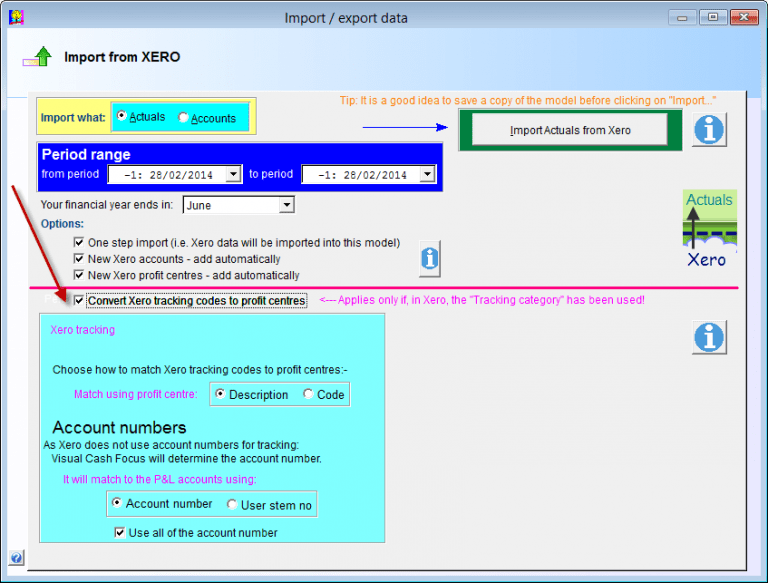
Click Import Actuals from Xero. Follow the same procedure as outlined above.
- Get key
- Paste in the key.
- Connect.
Now before clicking on Import, click on Use a tracking category (see diagram below).
As you are connected to Xero, a list of all the tracking categories for your company is now available. Choose the one that relates to the Visual Cash Focus profit centres. In our example it is Division.

4. Now click Import.
When done, you see the ready message. All operations have completed. Close this form now.
Now click on Accounts and budgets. You see that the profit centres are here and they correspond to the items under Division in Xero
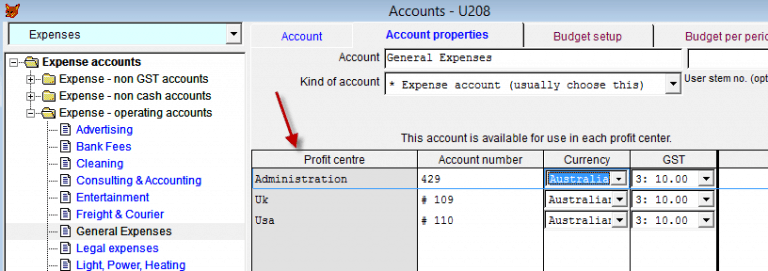
Note: You will see this if you posted an invoice in Xero that used these profit centres in the month of actuals. (If you do not see them return to Xero and create an invoice as instructed above).
Tip: Xero does not use account numbers for the profit centres. The Xero account numbers are assigned to the Administration profit centre. Visual Cash Focus assigns system account numbers to the other profit centres.
If you prefer to use your own numbering system for these, you can:
- Import the accounts only.
- Add the profit centres yourself into Visual Cash Focus, using your own numbering system.
- Then import Actuals from Xero.
Visual Cash Focus will work with your account numbers and put the Xero Actuals into the correct corresponding account.
Notes: The Integrator needs to talk to Xero over the internet. This is a legitimate action so, if your system displays a warning message, you should approve the communication.
Very occasionally Xero may not give permission for communication. When this happens, you will see a message. Should this happen, try again in a few minutes. ?
Suggestion: Print this page to help you use the Xero Integration form. It shows the 6 steps in order. Six steps for Xero Integration
Six steps for Xero Integration
- Get key – this starts your browser. It asks Xero for an Authorisation Code.
- Paste the Authorisation Code.
- Click Connect.
- If you use profit centres, click Use a tracking category.
- Choose a tracking category
- Click Import.
(If you don’t use profit centres, skip steps 4 and 5).

